Not as Skilled as Jarvis, But Let’s Fire This Up — Part 2

Not as Skilled as Jarvis, But Let’s Fire This Up — Part 2
Hey everyone, it’s been a while! I finally got the chance to publish this after a few minor setbacks. Last time, we created all the necessary files for our game — now, let’s take a deep dive into how we can make it all ready to run with just one pushing.
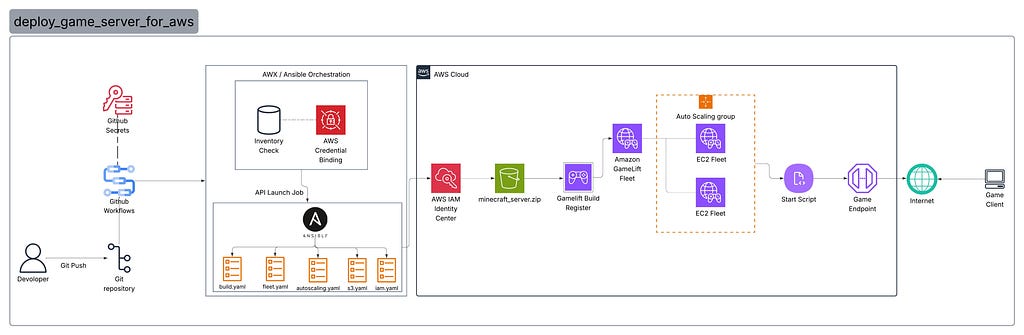
Diagram below might look a bit complicated — or even confusing — and you’re absolutely right. I felt the same way when I first tried to map it out in my mind. But let’s go step by step and explain what it does.
After preparing our game files, the main goal was to set up a well-organized and smoothly running system. That’s why I came up with a design that allows us to achieve maximum efficiency with minimal effort.
Once we push the necessary files to the Git repository, the GitHub workflow I’ll show below kicks in. This workflow will handle the checks on our servers and set up the required environment. This way, our playbooks are stored here, and we can easily run these .yaml files to configure everything on the AWS side very quickly.
Below are example files written for the workflow. To use them, you need to retrieve the necessary credentials from the AWX console and create a job.
name: 🚀 Auto-Deploy Minecraft Server via AWX

on:ya
  push:
    branches:
      - main

jobs:
  deploy-to-awx:
    runs-on: ubuntu-latest

    steps:
      - name: Checkout repository
        uses: actions/checkout@v4

      - name: Create or Update AWX Project
        run: |
          echo "🔧 Checking or creating AWX Project..."
          curl -s -X POST "${{ secrets.AWX_URL }}/api/v2/projects/" \
          -H "Content-Type: application/json" \
          -u "${{ secrets.AWX_USER }}:${{ secrets.AWX_PASS }}" \
          -d '{
            "name": "Minecraft_Deploy_Project",
            "scm_type": "git",
            "scm_url": "https://github.com/0gulcandogann/deploy_game_server_for_aws.git",
            "scm_branch": "main",
            "scm_update_on_launch": true
          }' || echo "Project already exists or updated."

      - name: Create or Update AWX Inventory
        run: |
          echo "📦 Checking or creating AWX Inventory..."
          curl -s -X POST "${{ secrets.AWX_URL }}/api/v2/inventories/" \
          -H "Content-Type: application/json" \
          -u "${{ secrets.AWX_USER }}:${{ secrets.AWX_PASS }}" \
          -d '{
            "name": "Minecraft_Inventory",
            "organization": 1
          }' || echo "Inventory already exists or updated."

      - name: Create AWX Credential (AWS)
        run: |
          echo "🔑 Creating AWX AWS credential..."
          curl -s -X POST "${{ secrets.AWX_URL }}/api/v2/credentials/" \
          -H "Content-Type: application/json" \
          -u "${{ secrets.AWX_USER }}:${{ secrets.AWX_PASS }}" \
          -d '{
            "name": "AWS_Credentials",
            "credential_type": 8,
            "organization": 1,
            "inputs": {
              "username": "${{ secrets.AWS_ACCESS_KEY_ID }}",
              "password": "${{ secrets.AWS_SECRET_ACCESS_KEY }}"
            }
          }' || echo "Credential already exists or updated."

      - name: Create or Update AWX Job Template
        run: |
          echo "🧱 Creating or updating AWX Job Template..."
          curl -s -X POST "${{ secrets.AWX_URL }}/api/v2/job_templates/" \
          -H "Content-Type: application/json" \
          -u "${{ secrets.AWX_USER }}:${{ secrets.AWX_PASS }}" \
          -d '{
            "name": "Deploy_Minecraft_Server",
            "job_type": "run",
            "inventory": 1,
            "project": 1,
            "playbook": "deploy_minecraft.yml",
            "credential": 1,
            "become_enabled": true
          }' || echo "Template already exists or updated."

      - name: Launch AWX Job Template
        run: |
          echo "🚀 Launching AWX Job Template..."
          curl -s -X POST "${{ secrets.AWX_URL }}/api/v2/job_templates/1/launch/" \
          -u "${{ secrets.AWX_USER }}:${{ secrets.AWX_PASS }}"
After completing all of this, the workflow continues as follows: Once you push your changes to the main branch, GitHub Actions automatically connects to your AWX (or Red Hat Ansible Automation Platform) instance, sets up the necessary resources (Project, Inventory, Credentials, and Job Template), and triggers the job. From that point on, AWX executes the Ansible playbook, which handles all AWS operations automatically — no manual access to AWX is required anymore.
Now, let’s go through the deployment process of the rule step by step as specified in main.yaml.
#main.yaml
---
- name: Deploy Minecraft Server to AWS GameLift (Vanilla)
  hosts: localhost
  connection: local
  gather_facts: false
  vars_files:
    - core/vars/main.yaml

  roles:
    - role: core.roles.iam
    - role: core.roles.s3
    - role: core.roles.build
    - role: core.roles.fleet
    - role: core.roles.autoscaling
Additionally, we specified the required names and the type of fleet to be created in the vars file as follows.
#vars.yaml
aws_region: "eu-central-1"
s3_bucket_name: "minecraft-gamelift-builds"
gamelift_build_name: "minecraft-vanilla-build"ya
gamelift_fleet_name: "minecraft-vanilla-fleet"
minecraft_port: 25565
instance_type: "c6i.large"
desired_instances: 1
min_instances: 1
max_instances: 3
First of all once this is triggered, the credentials we provided will be sent to AWS, and an IAM policy will be created first, as shown below.
#iam.yaml

---
- name: Create IAM role for GameLift to access S3
  amazon.aws.iam_role:
    name: "GameLiftAccessS3Role"
    assume_role_policy_document: |
      {
        "Version": "2012-10-17",
        "Statement": [
          {
            "Effect": "Allow",
            "Principal": {"Service": "gamelift.amazonaws.com"},
            "Action": "sts:AssumeRole"
          }
        ]
      }
  register: gamelift_iam_role

- name: Create policy for S3 access
  amazon.aws.iam_policy:
    name: "GameLiftS3AccessPolicy"
    state: present
    policy_document: |
      {
        "Version": "2012-10-17",
        "Statement": [
          {
            "Effect": "Allow",
            "Action": ["s3:GetObject", "s3:PutObject", "s3:ListBucket"],
            "Resource": "*"
          }
        ]
      }
  register: s3_policy

- name: Attach S3 policy to role
  amazon.aws.iam_policy_attachment:
    name: "AttachS3ToGameLift"
    roles:
      - "{{ gamelift_iam_role.role.name }}"
    policy_arn: "{{ s3_policy.policy.arn }}"
Next, we will continue by creating an S3 bucket to store our game files and upload the minecraft_server.zip folder that we pushed to github.
One thing to note here: GameLift generally expects a zip file for standalone systems. For games developed with engines like Unreal or Unity, it is recommended to use the GameSDKs provided by GameLift.
#s3.yaml
---
- name: Create S3 bucket for Minecraft builds
  amazon.aws.s3_bucket:
    name: "{{ s3_bucket_name }}"
    state: present
    region: "{{ aws_region }}"

- name: Upload Minecraft server build
  amazon.aws.s3_object:
    bucket: "{{ s3_bucket_name }}"
    object: "minecraft_server.zip"
    src: "{{ playbook_dir }}/minecraft_server.zip"
    mode: put
Okay, now that we’ve uploaded our game files, it’s time to create the build and launch our first fleet.
#build.yaml

---
- name: Look up current AWS account id
  community.aws.aws_caller_facts:
  register: caller

- name: Create GameLift build
  community.aws.gamelift_build:
    name: "{{ gamelift_build_name }}"
    operating_system: "AMAZON_LINUX_2"
    storage_location:
      bucket: "{{ s3_bucket_name }}"
      key: "minecraft_server.zip"
      role_arn: "arn:aws:iam::{{ caller.account_id }}:role/GameLiftAccessS3Role"
    state: present
  register: gamelift_build

- name: Save build id
  set_fact:
    gamelift_build_id: "{{ gamelift_build.build.id }}"
#fleet.yaml

---
- name: Create GameLift fleet for Minecraft
  community.aws.gamelift_fleet:
    name: "{{ gamelift_fleet_name }}"
    build_id: "{{ gamelift_build_id }}"
    instance_type: "{{ instance_type }}"
    ec2_inbound_permissions:
      - from_port: "{{ minecraft_port }}"
        to_port: "{{ minecraft_port }}"
        protocol: "TCP"
    runtime_configuration:
      server_processes:
        - launch_path: "./start.sh"
          concurrent_executions: 1
    desired_instances: "{{ desired_instances }}"
    new_game_session_protection_policy: "NoProtection"
  register: gamelift_fleet

- name: Save fleet id
  set_fact:
    gamelift_fleet_id: "{{ gamelift_fleet.fleet.id }}"
Alright, our server is now up and running. However, there’s one final task: if the number of players on the server increases or the chunk settings are raised, the area that the game needs to render will grow, potentially consuming most of the system resources. In this case, we will automate this process by configuring auto scaling.
#autoscaling.yaml
---
- name: Create a target-based autoscaling policy for the fleet
  community.aws.gamelift_fleet_auto_scaling_policy:
    name: "MinecraftAutoScale"
    fleet_id: "{{ gamelift_fleet_id }}"
    policy_type: "TargetBased"
    target_configuration:
      target_value: 25
      target_value_dimension: PercentAvailableGameSessions
  register: autoscaling_policy
Yes, everything is ready now and our server is set up; you can start playing. But first, let’s do a quick check to see if it’s active.
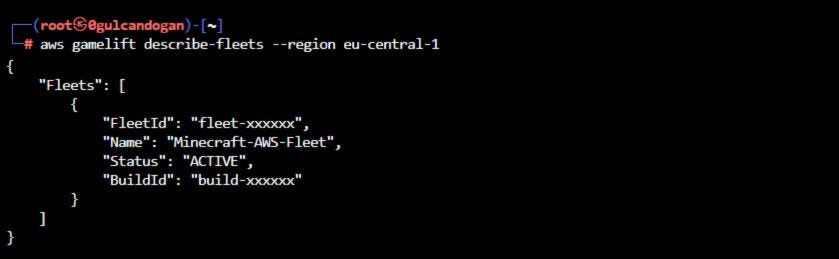
Alright, from now on you can find your IP address and port through the CLI or console and connect directly to the game.
Thank you for being with me on this endless adventure; it was truly a strange experience. You can access the project files via my GitHub profile, and you can either develop this project further or we can set sail on different projects together. For now, stay safe, and may your sword remain sharp 🙃