Having a Key Doesn’t Always Open Every Door: IAM Roles Anywhere

Life is easy when you’re inside AWS. Attach an IAM role to an EC2 instance, and you’re done. But what if your server isn’t running in AWS? What if it’s a legacy application sitting in a data center, an IoT device on a factory floor, or even a Raspberry Pi tucked away under your desk that needs to access AWS? (Just kidding we won’t be breaking into anything in this article :d)
Traditional approach was always the same: put an access key on the machine, drop it into the ~/.aws/credentials file, and hope for the best. As we've discussed before, anywhere you leave a static access key today is a place you're likely to forget about tomorrow.
IAM Roles Anywhere exists to solve exactly this problem. It brings the “use roles, not access keys” philosophy beyond AWS and into the outside world. In this article, we’ll explore not only how it works, but also how to set it up step by step in a real-world environment
Identity, Not Access Keys
The core idea behind IAM Roles Anywhere is simple. Instead of carrying a long-lived access key, a workload running outside AWS proves its identity using an X.509 certificate. That certificate comes from your own Public Key Infrastructure (PKI), whether it’s signed by a Certificate Authority (CA) you manage yourself or by AWS Private CA.
The difference is significant. An access key can be copied, shared, accidentally committed to GitHub, or exposed in countless other ways. An X.509 certificate works differently. Its private key never leaves the device. It’s used only to generate a cryptographic signature, and only that signature is sent to AWS. The private key always remains under your control.
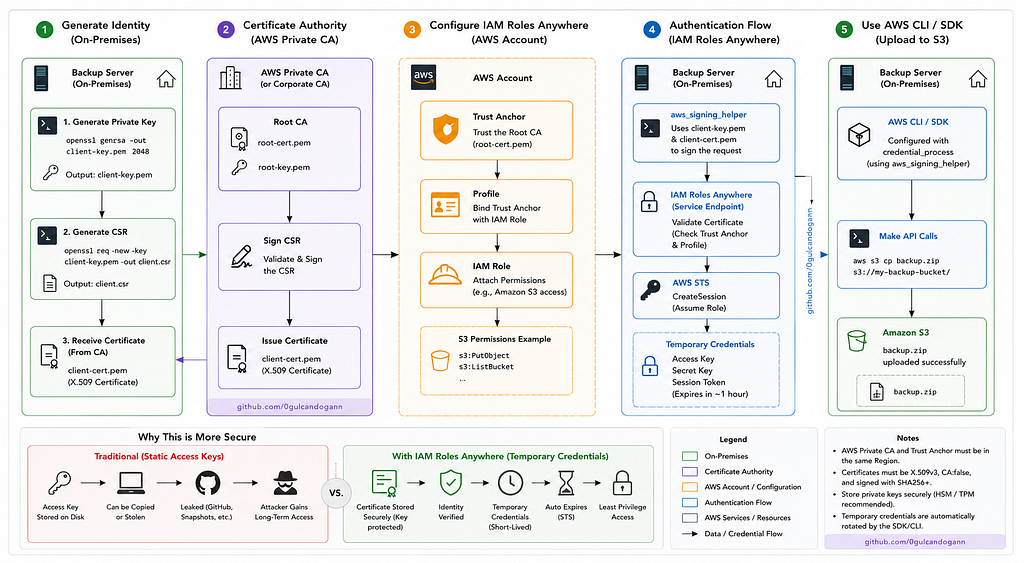
Here’s a practical example. Imagine you have an on-premises backup server that uploads data to Amazon S3 every night. Instead of creating an IAM user and storing an access key on that server, you install a certificate and let IAM Roles Anywhere obtain temporary credentials on its behalf. Even if the server is compromised, the attacker gains only short-lived credentials rather than a permanent access key.
Three Corners of the Triangle (Trust Anchor, Profile, and Role)
The easiest way to understand IAM Roles Anywhere is to see how its three core components fit together.
- Trust Anchor: The mechanism that tells AWS, “I trust certificates issued by this Certificate Authority (CA).”
- Profile: The layer that connects a Trust Anchor to one or more IAM roles.
- Role: The component that defines the actual permissions. To be assumed through IAM Roles Anywhere, it must trust the rolesanywhere.amazonaws.com service principal.
Without these three components, the system simply doesn’t work. If one corner of the triangle is missing, the entire model falls apart.
Now it’s time to build that triangle ourselves. We’ve covered the theory, so let’s move on to the practical setup.
IAM Roles Anywhere Flow
So far, we’ve explored the three core components of IAM Roles Anywhere. Now let’s put them into a single end-to-end flow. The diagram below shows how everything fits together and makes one thing clear: the only thing crossing the boundary is a certificate. There are no long-lived access keys involved.
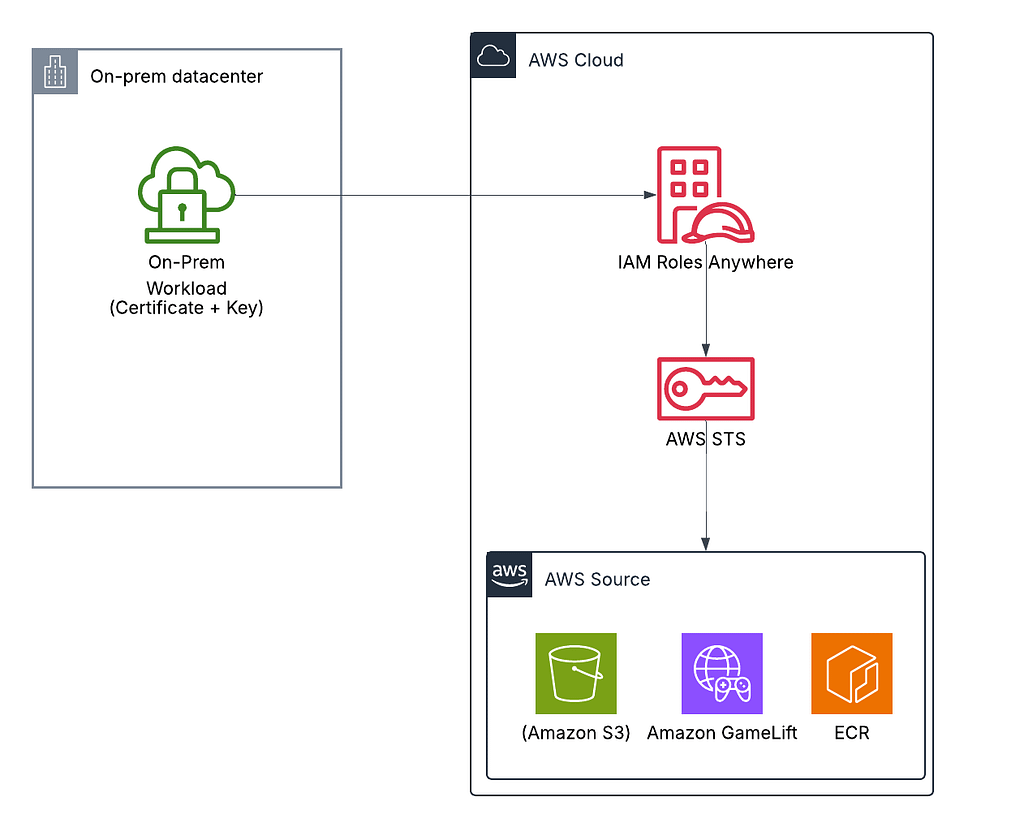
On-premises workload crosses the boundary by presenting its X.509 certificate. On the AWS side, IAM Roles Anywhere verifies its identity, AWS Security Token Service (STS) issues temporary credentials, and those credentials are then used to access the target AWS resource. Now let’s build this flow step by step, starting with the certificate itself.
How Is a Certificate Created?
The first question is simple: where does this certificate come from? The answer is either AWS Private CA or your own Public Key Infrastructure (PKI). If your organization doesn’t already operate a Certificate Authority (CA), AWS Private CA provides one as a managed service.
When you create a CA in AWS Private CA, you’ll encounter a few important decisions:
- Root CA or Subordinate CA? A CA can either sit at the top of the trust chain as a Root CA or operate beneath another CA as a Subordinate CA.
- General-purpose or Short-lived? A Short-lived CA can issue certificates that are valid for up to seven days. This is an effective way to reduce the impact of compromised certificates, but it isn’t suitable for every workload. A General-purpose CA supports longer-lived certificates, although it comes with a higher monthly cost.
- Revocation mechanism. If a certificate is compromised or should no longer be trusted, you can revoke it using either a Certificate Revocation List (CRL) or the Online Certificate Status Protocol (OCSP).
For a lab environment, you can create and use your own self-signed Root CA. You should never do this in production, but it’s perfect for understanding how the process works. Let’s assume we already have our root certificate and private key (root-cert.pem and root-key.pem). Now it's time to issue a client certificate.
# 1. Generate a private key and Certificate Signing Request (CSR) for the client
openssl req \
    -nodes \
    -new \
    -keyout certificates_data/client/client-key.pem \
    -out certificates_data/client/client-csr.pem \
    -config certificates_data/client/client.conf

Output:
Generating a RSA private key
..............+++++
writing new private key to 'certificates_data/client/client-key.pem'
-----
# 2. Sign the CSR with the Root CA to issue the client certificate
openssl x509 \
    -req \
    -in certificates_data/client/client-csr.pem \
    -CA certificates_data/root-ca/root-cert.pem \
    -CAkey certificates_data/root-ca/root-key.pem \
    -set_serial 2 \
    -out certificates_data/client/client-cert.pem \
    -days 365 \
    -sha256 \
    -extfile certificates_data/client/client.conf \
    -extensions v3

Output:
Certificate request self-signature ok
subject=CN = backup-server-01
First command generates two things: the private key that will represent the workload’s identity and a Certificate Signing Request (CSR), which is essentially the workload asking, “Can you sign my certificate?” The second command uses the Root CA’s private key to sign that request and issue the actual certificate (client-cert.pem). Think of it like a notary verifying your identity before issuing an official document.
Building the Triangle for Real
Now that we have our certificate, it’s time to build the three core components of IAM Roles Anywhere: the Trust Anchor, the IAM Role, and the Profile.
Step 1: Create a Trust Anchor
aws rolesanywhere create-trust-anchor \
    --name "on-prem-backup-ca" \
    --source sourceType=CERTIFICATE_BUNDLE,sourceData="{x509CertificateData=$(cat certificates_data/root-ca/root-cert.pem)}" \
    --enabled

Output:
...
{
  "trustAnchor": {
    "trustAnchorId": "a1b2c3d4-5678-90ab-cdef-EXAMPLE11111",
    "name": "on-prem-backup-ca",
    "enabled": true,
    "trustAnchorArn": "arn:aws:rolesanywhere:eu-west-1:123456789012:trust-anchor/a1b2c3d4-5678-90ab-cdef-EXAMPLE11111"
  }
}
...
Step 2: Create an IAM Role (with a Trust Policy)
{
  "Version": "2012-10-17",
  "Statement": [
    {
      "Effect": "Allow",
      "Principal": { "Service": "rolesanywhere.amazonaws.com" },
      "Action": ["sts:AssumeRole", "sts:SetSourceIdentity", "sts:TagSession"],
      "Condition": {
        "ArnEquals": {
          "aws:SourceArn": "arn:aws:rolesanywhere:eu-west-1:123456789012:trust-anchor/a1b2c3d4-5678-90ab-cdef-EXAMPLE11111"
        }
      }
    }
  ]
}
Condition block is important. It ensures that this role can only be assumed through your specific Trust Anchor.
aws iam create-role \
    --role-name backup-server-role \
    --assume-role-policy-document file://trust-policy.json
Step 3: Create a Profile
aws rolesanywhere create-profile \
    --name "backup-server-profile" \
    --role-arns "arn:aws:iam::123456789012:role/backup-server-role" \
    --enabled

Output:

...
{
  "profile": {
    "profileId": "f9e8d7c6-1234-5678-90ab-EXAMPLE22222",
    "name": "backup-server-profile",
    "profileArn": "arn:aws:rolesanywhere:eu-west-1:123456789012:profile/f9e8d7c6-1234-5678-90ab-EXAMPLE22222"
  }
}
At this point, all three corners of the triangle are in place.
Putting the Role to Work (A Day Without Access Keys)
The final step is to let our backup server obtain temporary AWS credentials using its certificate. We don’t have to generate or sign the request ourselves. AWS provides the official aws_signing_helper utility, which handles the entire signing process and retrieves temporary credentials on our behalf.
aws_signing_helper credential-process \
    --certificate certificates_data/client/client-cert.pem \
    --private-key certificates_data/client/client-key.pem \
    --trust-anchor-arn arn:aws:rolesanywhere:eu-west-1:123456789012:trust-anchor/a1b2c3d4-5678-90ab-cdef-EXAMPLE11111 \
    --profile-arn arn:aws:rolesanywhere:eu-west-1:123456789012:profile/f9e8d7c6-1234-5678-90ab-EXAMPLE22222 \
    --role-arn arn:aws:iam::123456789012:role/backup-server-role
# Use the ARN values of the Trust Anchor, IAM Role, and Profile you created earlier.

Output:

...
{
  "Version": 1,
  "AccessKeyId": "ASIAEXAMPLE1234567",
  "SecretAccessKey": "wJalrXUtEXAMPLEKEYEXAMPLEKEYEXAMPLE",
  "SessionToken": "IQoJb3JpZ2luX2VjEXAMPLE...",
  "Expiration": "2026-07-18T14:32:00Z"
}
...
All we need to do now is add this configuration to our ~/.aws/config file.
# ~/.aws/config
[profile backup-server]
credential_process = aws_signing_helper credential-process --certificate ... --private-key ... --trust-anchor-arn ... --profile-arn ... --role-arn ...
Now let’s try an actual command. Since this is our backup server, we’ll upload a backup.tar.gz file to S3.
aws s3 cp backup.tar.gz s3://my-backup-bucket/ --profile backup-server
upload: ./backup.tar.gz to s3://my-backup-bucket/backup.tar.gz
Certificates Have Rules Too
IAM Roles Anywhere doesn’t accept just any certificate. A client certificate must meet a few requirements:
- It must be an X.509 version 3 (X.509v3) certificate.
- It must have CA:FALSE set in the Basic Constraints extension.
- It must use a secure signature algorithm such as SHA-256 or stronger. Legacy algorithms like MD5 and SHA-1 are not supported.
You can also add additional restrictions in your IAM role’s trust policy based on the certificate’s Subject or Issuer fields. For example, you can require that only certificates with CN=backup-server-01 are allowed to assume the role.
One final thing to keep in mind is that AWS Private CA is a regional service. If your workloads operate across multiple AWS Regions, you’ll need to create a separate Private CA in each Region where you want to issue or manage certificates.
How Should You Store Your Private Key?
So far, we’ve kept client-key.pem as a regular file on disk. That's perfectly fine for a lab environment, but in production, it's practically an invitation for trouble. A private key stored on disk is still a secret that can be copied or stolen. In other words, you've recreated the very problem IAM Roles Anywhere is trying to solve. The only difference is that you've replaced a static access key with a static private key.
The solution is to make the private key non-exportable, meaning it never leaves the hardware where it was generated.
- PKCS#11-compatible devices (HSMs, YubiKeys, and smart cards): The private key is generated inside the hardware and never leaves it. The aws_signing_helper utility delegates the signing operation to the device, but it never has direct access to the private key itself.
- TPM 2.0: Since late 2024, aws_signing_helper has supported Trusted Platform Module (TPM) 2.0 directly. This means many servers and laptops can securely store private keys using the TPM that's already built into the hardware, without requiring a separate HSM or security token.
In practice, the aws_signing_helper command remains almost identical. The only difference is that instead of pointing to a key file on disk, you provide a PKCS#11 URI that references the key stored inside the hardware.
aws_signing_helper credential-process \
    --cert-selector "Url=pkcs11:token=backup-server-token;object=client-cert" \
    --trust-anchor-arn arn:aws:rolesanywhere:eu-west-1:123456789012:trust-anchor/a1b2c3d4-5678-90ab-cdef-EXAMPLE11111 \
    --profile-arn arn:aws:rolesanywhere:eu-west-1:123456789012:profile/f9e8d7c6-1234-5678-90ab-EXAMPLE22222 \
    --role-arn arn:aws:iam::123456789012:role/backup-server-role
A simple rule of thumb: if your server is critical — for example, it handles financial data or belongs to a government or defense environment — don’t store the private key on disk. Keep it protected inside an HSM or TPM instead. If you absolutely must store it as a file, lock down its permissions (for example, chmod 400) and never include that private key in a machine image or snapshot.
Same Lesson, A Different Door
Earlier, when we talked about using IAM roles instead of IAM users, the core lesson was simple: long-lived credentials create long-lived risk, while temporary credentials create controlled risk. IAM Roles Anywhere extends that same principle beyond the boundaries of AWS.
At that point, it no longer matters whether your workload is running inside AWS or somewhere else. The rule stays the same: don’t carry a permanent access key. Prove your identity, obtain temporary credentials, and get your work done.
And remember, even if someone steals a certificate, they haven’t stolen a permanent key. At most, they’ve obtained a ticket that’s valid for only a few hours. But even that protection becomes meaningless if the private key behind the certificate wasn’t stored securely in the first place.
IAM Roles Anywhere doesn’t introduce a brand-new security model. It simply brings the best practice we’ve followed inside AWS for years to workloads running outside of it. No matter where your applications live, the principle remains the same: temporary credentials instead of long-lived secrets, and identity instead of access keys.
References
- IAM Roles Anywhere — Getting Started Guide
- IAM Roles Anywhere — Credential Helper Documentation
- IAM Roles Anywhere — User Guide & Document History
- AWS Private CA User Guide
- IAM Roles Anywhere — Trust Model and Signature Validation
- IAM Roles Anywhere — Authentication and CreateSession Process
- AWS Security Token Service (STS) Documentation
- What’s New — IAM Roles Anywhere Credential Helper Adds TPM 2.0 Support
- OpenSSL Documentation — X.509 Certificates and Certificate Management
- PKCS #11 Cryptographic Token Interface Standard (OASIS)