Guardians of the Vault: Who Really Holds the Keys, Data Protection Part-2

Hi guys,
In Part 1, we explored Amazon S3 authorization, S3 encryption, and Amazon Macie. This time, we’re taking things to the next level.
At first glance, everything we’ve covered in this series may seem to have a single purpose: encrypting data. While that’s true, there’s a much bigger picture. You might think this article is simply about the services that generate, store, and protect cryptographic keys. You’d be partly right. My goal is to show you how to build a secure architecture from the ground up. We’ll examine not only the services themselves but also how they work together to create a strong security foundation.
Everything covered here also serves as a practical guide for the AWS Certified Security Specialty (SCS-C03) certification, helping you understand not only the exam topics but also how these services are used in real-world AWS environments.
In this article, we’ll dive into the internals of AWS Key Management Service (AWS KMS), AWS CloudHSM, AWS Secrets Manager, and AWS Certificate Manager (ACM). I hope you’re ready — let’s get started.
Let’s get started! 🔥
KMS Key Types: Who Actually Owns What
First question you should ask is, what is a key, really? Is it simply a sequence of 1s and 0s that unlocks encrypted data, or is it something more specific, like a KMS Key, Data Key, Data Key Pair, or HMAC Key?
The second question is who owns and manages that key. If you’ve read my previous article on Non-Human Identities, you already know that ownership matters just as much as the key itself.
These are two completely different concepts, and sooner or later you’ll probably find yourself wondering, “Which key belongs to me again?” To avoid that confusion, let’s first look at key ownership.
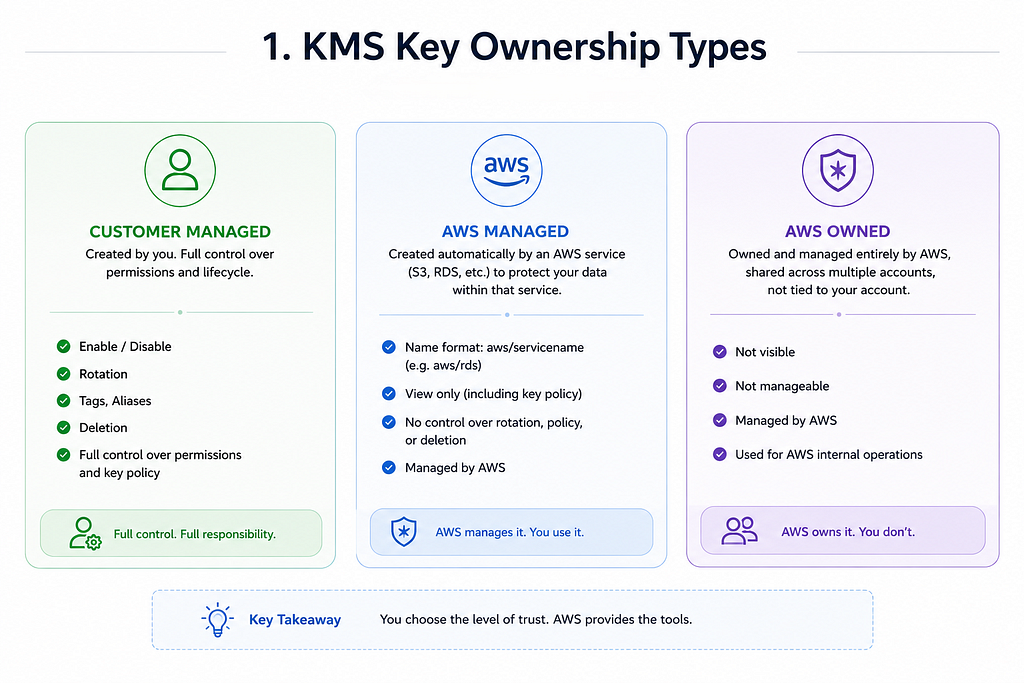
From an ownership perspective, KMS Keys fall into three categories:
- Customer Managed Key: Created by you. You have full control over permissions, the key lifecycle, enabling or disabling the key, rotation, tags, aliases, and deletion.
- AWS Managed Key: Automatically created by AWS services such as Amazon S3 or Amazon RDS to protect your data. These keys follow the naming convention aws/service-name, such as aws/rds. You can view the key and its Key Policy, but you can't manage its rotation, modify its Key Policy, or delete it.
- AWS Owned Key: Fully owned and managed by AWS. These keys are shared across multiple AWS accounts and aren’t even associated with your account. You can’t see them, manage them, or interact with them. They simply work behind the scenes to provide encryption for AWS-managed services.
Symmetric vs Asymmetric KMS Keys
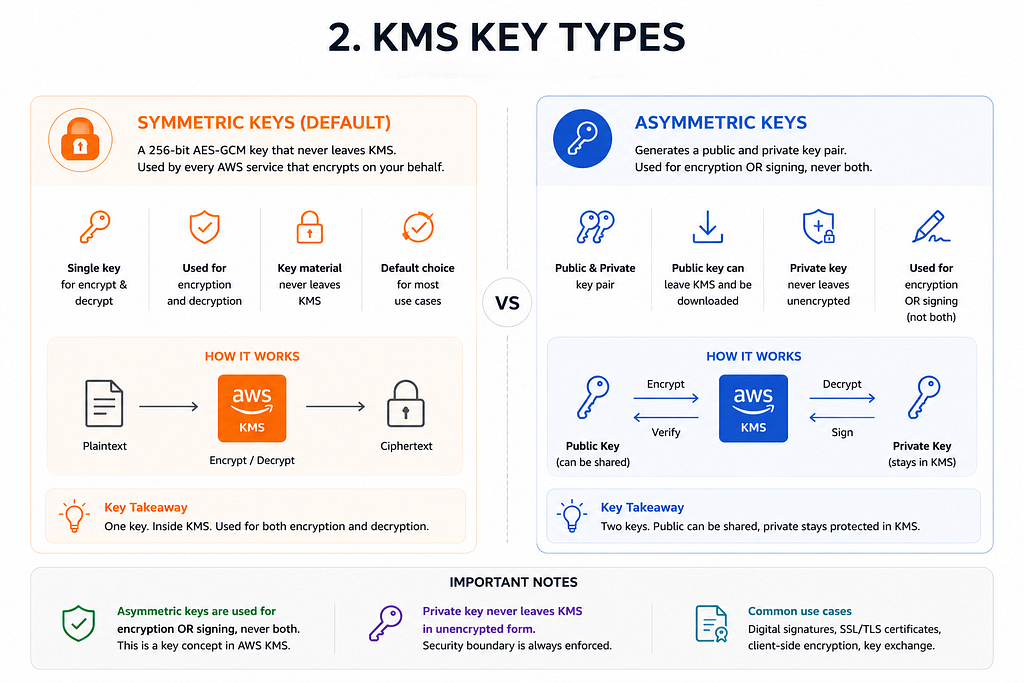
By default, a KMS Key is a symmetric key. It uses the 256-bit AES-GCM algorithm and never leaves AWS KMS. Nearly every AWS service that encrypts data on your behalf relies on this symmetric key model.
You can also create an asymmetric KMS Key. In this case, AWS KMS generates a public key and private key pair. One detail that is often overlooked, especially in certification exams and scenario-based questions, is that an asymmetric key can be used either for encryption or for digital signing, but never both at the same time.
With this model, the public key can safely leave AWS KMS and can even be downloaded. The private key, however, never leaves AWS KMS in plaintext. AWS KMS always keeps the private key protected within the service.
Data Keys vs Data Key Pairs (Same Name, Different Beast)
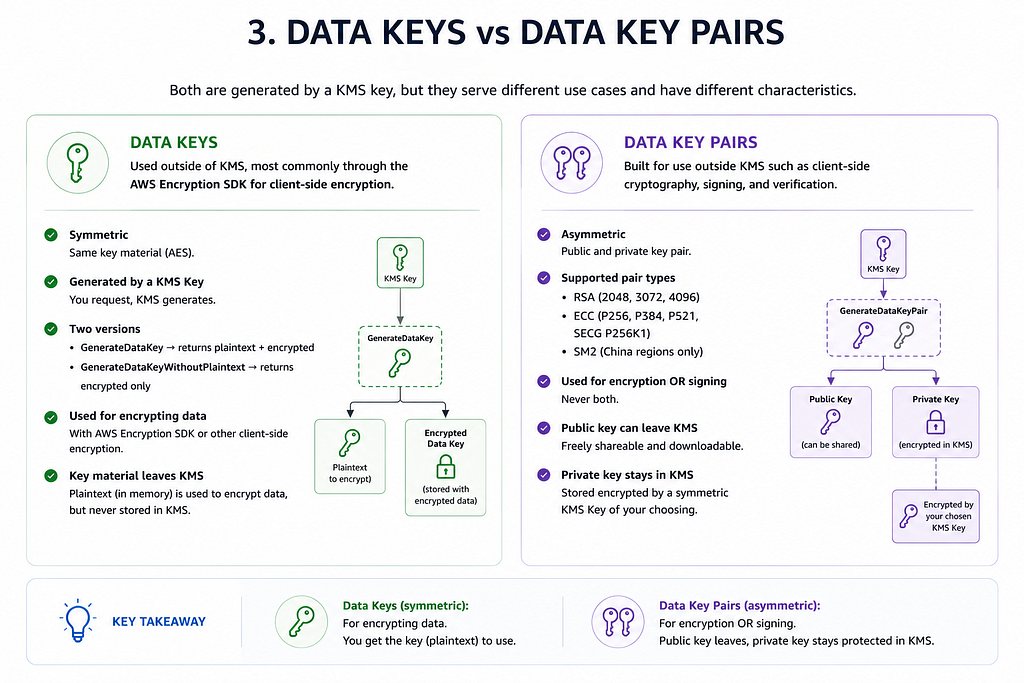
Data Keys can be generated by a KMS Key, but they are intended to be used outside AWS KMS. Their most common use case is client-side encryption with the AWS Encryption SDK.
The GenerateDataKey API returns two versions of the same key: a plaintext version and an encrypted version. In contrast, GenerateDataKeyWithoutPlaintext returns only the encrypted version. This is typically preferred when you don't need to encrypt data immediately.
Although receiving two versions may make it seem like an asymmetric key, a Data Key is still a symmetric key. Both outputs represent the same key material. One is in plaintext, while the other is encrypted by a KMS Key.
A Data Key Pair, on the other hand, is an asymmetric key pair designed to be used outside AWS KMS. It is intended for client-side cryptography, digital signing, and signature verification.
The supported key pair types are:
- RSA (2048, 3072, and 4096 bits): Commonly used for certificates and general-purpose asymmetric encryption.
- ECC (NIST P-256, NIST P-384, NIST P-521, and SECG P-256K1): Preferred for high-performance cryptographic operations. The SECG P-256K1 curve is widely used in cryptocurrency-related applications.
- SM2: A Chinese cryptographic standard supported only in AWS China Regions.
In this model, the private key is encrypted and securely stored using the symmetric KMS Key that you choose.
Key Rotation: What Actually Changes Under the Hood
Automatic Rotation is the approach AWS recommends, and it's also the one you'll use most of the time. Once you enable it, AWS takes care of the entire rotation process for you.
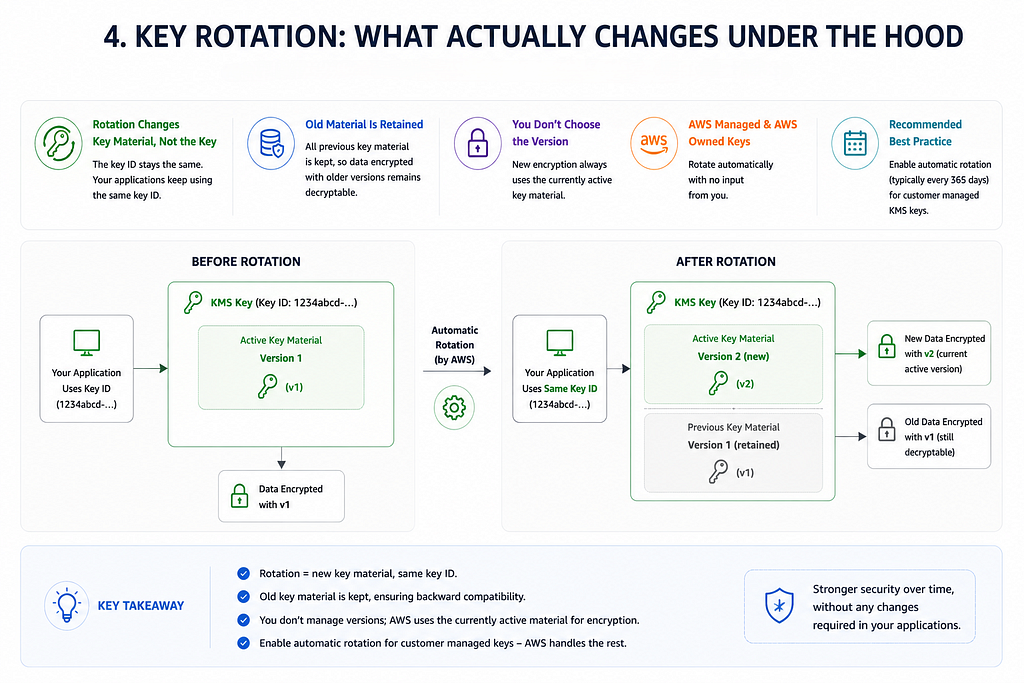
The most important thing to remember is this: rotation does not replace the KMS Key itself; it only changes the key material. Your applications continue to reference the same Key ID, so from your perspective, nothing changes. Since the Key ID stays the same, you don't need to update your applications or configurations.
So, what happens to your old data?
This is where the design becomes really elegant. AWS keeps every previous version of the key material, which means you can still decrypt data that was encrypted years ago with an older version of the key.
When encrypting new data, you don’t get to choose which version of the key material is used. AWS always encrypts using the currently active key material.
One last thing. If you’re using an AWS Managed Key or an AWS Owned Key, you don’t have to think about rotation at all. AWS handles it automatically and manages the entire process behind the scenes.
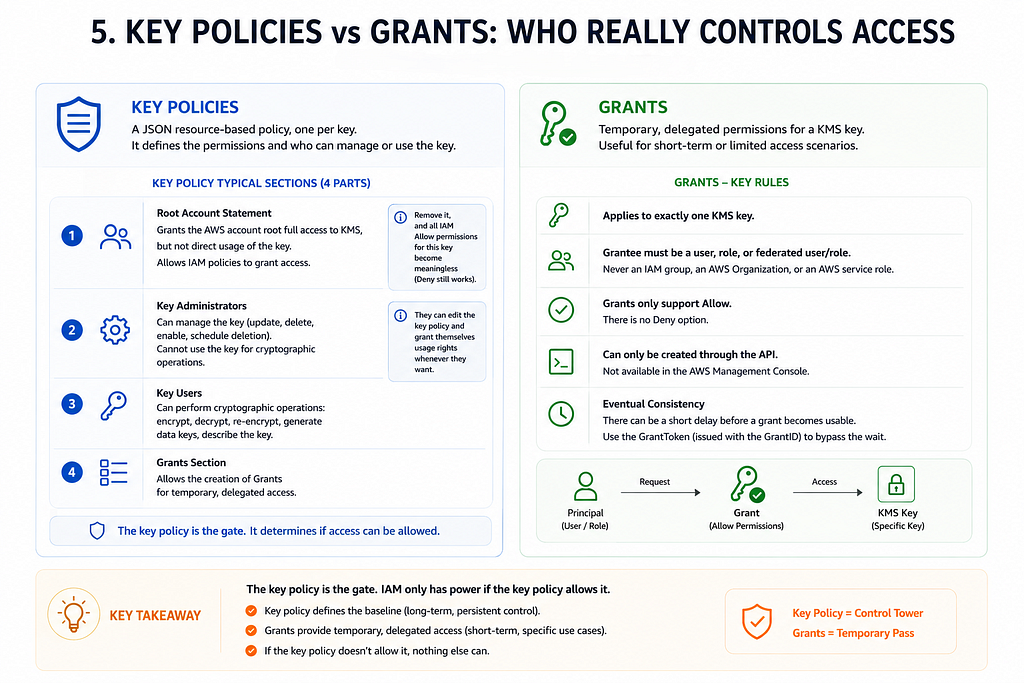
Key Policies vs Grants: Who Really Controls Access
So far, we’ve talked about who creates a key and who owns it. But what about the question, “Who is actually allowed to use this key?” That’s where Key Policies come in.
A Key Policy is a JSON-based resource policy that's attached to a single KMS Key. Every KMS Key has exactly one Key Policy, and it usually consists of four main sections.
The first section is for the AWS Account Root. This is one of the most misunderstood parts of AWS KMS. It doesn’t give the root user permission to perform cryptographic operations like Encrypt or Decrypt. Instead, it allows IAM Policies to grant permissions on that key. If you remove this statement, every Allow permission you've granted through IAM immediately becomes useless (Deny statements still work). It also ensures that your key can never become permanently inaccessible because the root account itself can never be deleted.
The second section is for Key Administrators. These identities can manage the key. They can update the Key Policy, enable or disable the key, or schedule it for deletion. What they can't do is use the key for cryptographic operations such as Encrypt or Decrypt. However, there's an important detail here. Since they can modify the Key Policy, they can simply grant themselves permission to use the key whenever they need to.
The third section is for Key Users. These are the identities that actually use the key. They can perform cryptographic operations such as Encrypt, Decrypt, ReEncrypt, GenerateDataKey, and DescribeKey.
The final section allows you to create Grants.
You can think of a Grant as temporarily handing someone the key to your house. It gives a specific identity temporary permission to perform specific operations on a specific KMS Key. Of course, there are a few rules.
First, a Grant always applies to one KMS Key only. The grantee can only be an IAM User, IAM Role, or Federated User/Role. You can't create a Grant for an IAM Group, an AWS Organization, or similar identities.
Another important rule is that Grants only support Allow permissions. There is no way to create a Deny Grant.
Also, you can’t create Grants from the AWS Management Console. You'll need to use the AWS API, AWS CLI, or an AWS SDK instead.
Finally, here’s a small detail that often appears in certification exams. After creating a Grant, you may experience a short delay because AWS KMS follows an eventual consistency model. If you need to use the Grant immediately, simply include the GrantToken returned during Grant creation to bypass the waiting period.
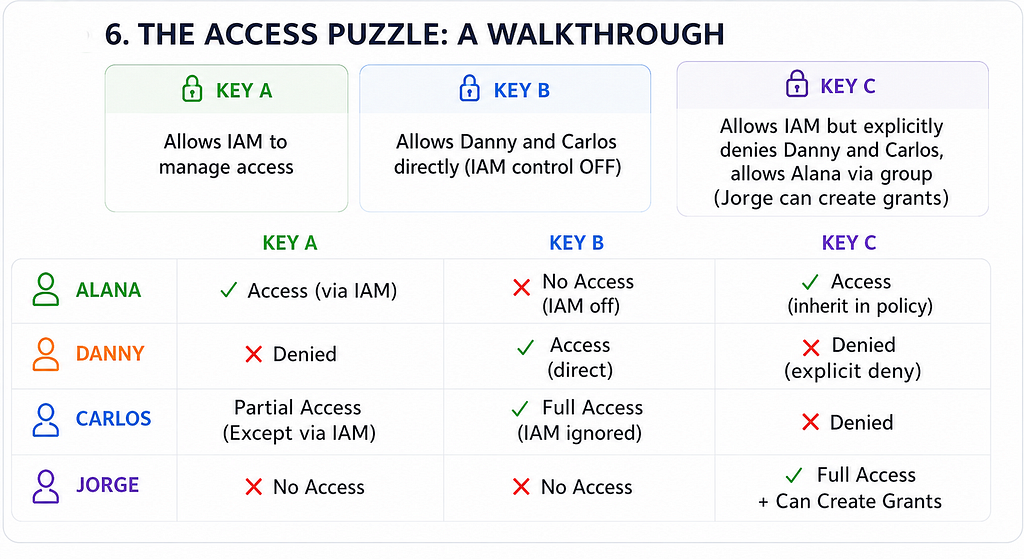
The Access Puzzle: A Walkthrough
Now let’s understand this with a simple scenario.
Imagine we have three different KMS Keys.
- Key A allows IAM Policies to grant access.
- Key B completely ignores IAM and grants access directly to Danny and Carlos through its Key Policy.
- Key C allows IAM, but explicitly denies Danny and Carlos. At the same time, it allows Alana and Jorge, with Jorge also having permission to create Grants`.
Now let’s see who can access what.
Let’s start with Alana. She can use Key A because the Key Policy allows IAM permissions to be evaluated, and IAM grants her access. She can also use Key C because she's explicitly allowed in the Key Policy. However, she can't use Key B because that key ignores IAM completely, and Alana isn't listed in its Key Policy.
Next is Danny. He can only use Key B because he’s explicitly allowed in its Key Policy. On Key C, he's blocked by an Explicit Deny, and once an Explicit Deny exists, no other permission can override it.
Now let’s look at Carlos. On Key A, IAM gives him permission to perform only the Encrypt operation. On Key B, he has full access because he's directly listed in the Key Policy. In this case, it doesn't matter what his IAM permissions say because Key B doesn't evaluate IAM at all. On Key C, just like Danny, he's blocked by an Explicit Deny.
Finally, we have Jorge. He has no permissions on Key A or Key B. On Key C, however, he has full access to use the key and is also allowed to create Grants for delegated access.
If there’s only one thing you remember from this scenario, let it be this:
In AWS KMS, the Key Policy is the gatekeeper.
IAM Policies can't open the door by themselves. The Key Policy must first say, "Yes, IAM permissions are allowed to control access to this key." If the Key Policy contains an Explicit Deny, the conversation ends there. It doesn't matter if the identity has AdministratorAccess or any other IAM Allow permission. The door stays closed.
Once you understand this rule, most AWS KMS authorization scenarios become much easier to solve.
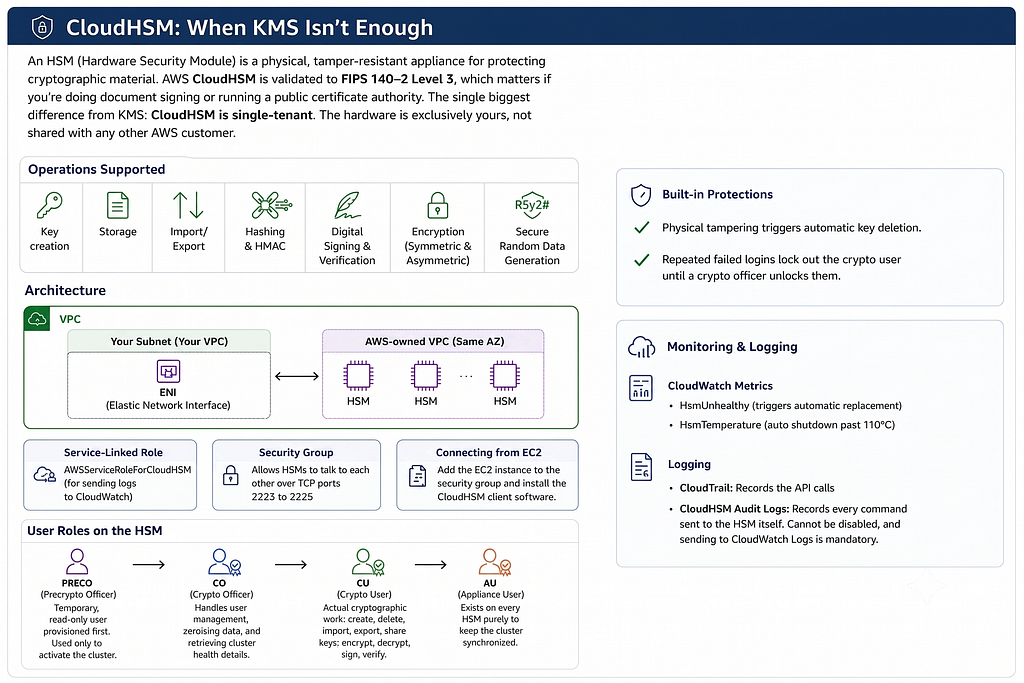
CloudHSM: When KMS Isn’t Enough
So far, we’ve been managing our cryptographic keys securely with AWS KMS. But what if one day someone asked you, “I don’t want my keys to live on AWS’s shared infrastructure. I want them stored on dedicated hardware that belongs only to me.” That’s exactly where AWS CloudHSM comes in.
A Hardware Security Module (HSM) is a physical, tamper-resistant device designed to protect cryptographic keys. AWS CloudHSM is validated to FIPS 140–2 Level 3, making it a great fit if you’re performing digital signing, operating your own Certificate Authority (CA), or need to meet strict regulatory requirements.
The biggest difference between CloudHSM and AWS KMS can be summarized in one sentence:
With KMS, the underlying hardware is shared. With CloudHSM, the hardware is dedicated entirely to you.
What can you do with CloudHSM?
- Create and securely store cryptographic keys.
- Import and export keys.
- Perform both symmetric and asymmetric encryption.
- Generate and verify digital signatures.
- Compute hashes and HMACs.
- Generate cryptographically secure random numbers.
How does CloudHSM work?
Everything starts by creating a Cluster. A cluster consists of multiple HSMs distributed across different Availability Zones to provide high availability. Before creating one, you’ll need a VPC.
There’s also a small but important detail worth remembering.
- The component inside your subnet is not the HSM itself.
- What actually gets placed in your subnet is an Elastic Network Interface (ENI).
- The physical HSM hardware runs inside a separate AWS-owned VPC within the same Availability Zone.
When you create a cluster, AWS automatically:
- Creates a Service-Linked Role named AWSServiceRoleForCloudHSM.
- Creates a dedicated Security Group that allows HSMs to communicate with each other over TCP ports 2223–2225.
If you want to connect an EC2 instance to your CloudHSM cluster, you only need to do two things:
- Add the EC2 instance to the CloudHSM Security Group.
- Install the CloudHSM Client software.
CloudHSM user roles
CloudHSM has four built-in user roles.
- PRECO (Pre Crypto Officer): A temporary user created when the cluster is first provisioned. Once you change its password, it becomes a Crypto Officer.
- CO (Crypto Officer): Manages users, performs zeroization, and monitors the health of the cluster.
- CU (Crypto User): Creates, deletes, imports, exports, and shares keys. This role also performs Encrypt, Decrypt, Sign, and Verify operations.
- AU (Appliance User): Keeps all HSMs in the cluster synchronized. You won't interact with this role directly.
Security features
There are two security features that are especially worth remembering.
- If someone physically tampers with the HSM, it detects the attack and automatically deletes all cryptographic keys stored inside.
- If a Crypto User enters the wrong password too many times, the account is locked. Only a Crypto Officer can unlock it.
Monitoring and logging
On the monitoring side, two CloudWatch metrics are particularly useful:
- HsmUnhealthy: If an HSM becomes unhealthy, AWS automatically replaces it.
- HsmTemperature: If the temperature exceeds 110°C, the HSM automatically shuts itself down.
For logging, there are two separate services:
- AWS CloudTrail records all CloudHSM API calls.
- CloudHSM Audit Logs record every command executed on the HSM itself.
Finally, here’s one last detail worth remembering. CloudHSM Audit Logs cannot be disabled. In addition, sending these logs to CloudWatch Logs is mandatory.
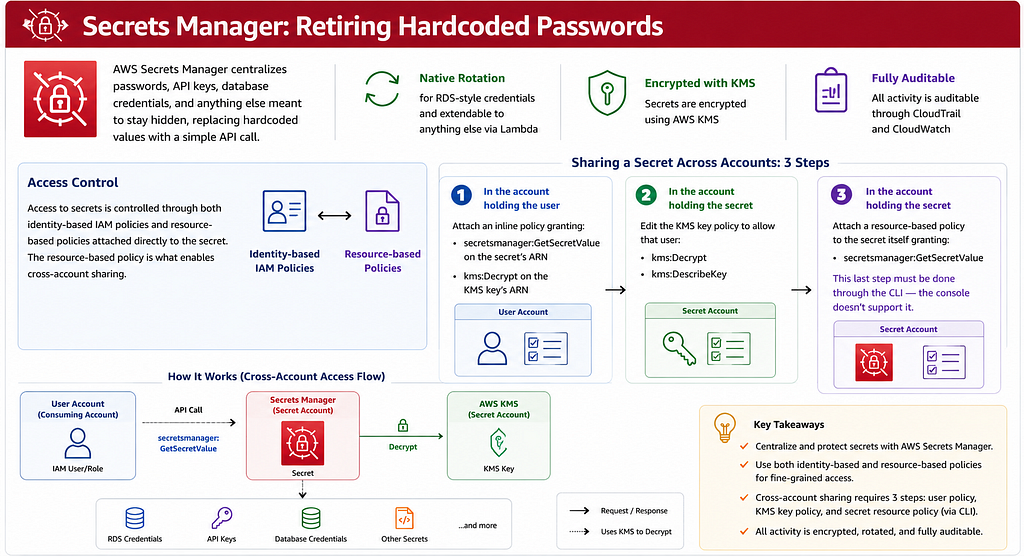
Secrets Manager: Retiring Hardcoded Passwords
Secrets Manager centralizes passwords, API keys, database credentials, and anything else meant to stay hidden, replacing hardcoded values with a simple API call. Rotation is native for RDS-style credentials and extendable to anything else via Lambda. Secrets are encrypted with KMS, and activity is fully auditable through CloudTrail and CloudWatch.
Access runs through both identity-based IAM policies and resource-based policies attached directly to the secret, and that second option is what makes cross-account sharing possible.
Sharing a secret across accounts takes three moves. First, in the account holding the user, attach an inline policy granting secretsmanager:GetSecretValue on the secret's ARN and kms:Decrypt on the KMS key's ARN. Second, in the account holding the secret, edit the KMS key policy to allow that user kms:Decrypt and kms:DescribeKey. Third, still in the account holding the secret, attach a resource-based policy to the secret itself granting GetSecretValue, but this last step has to happen through the CLI, the console doesn't support it.
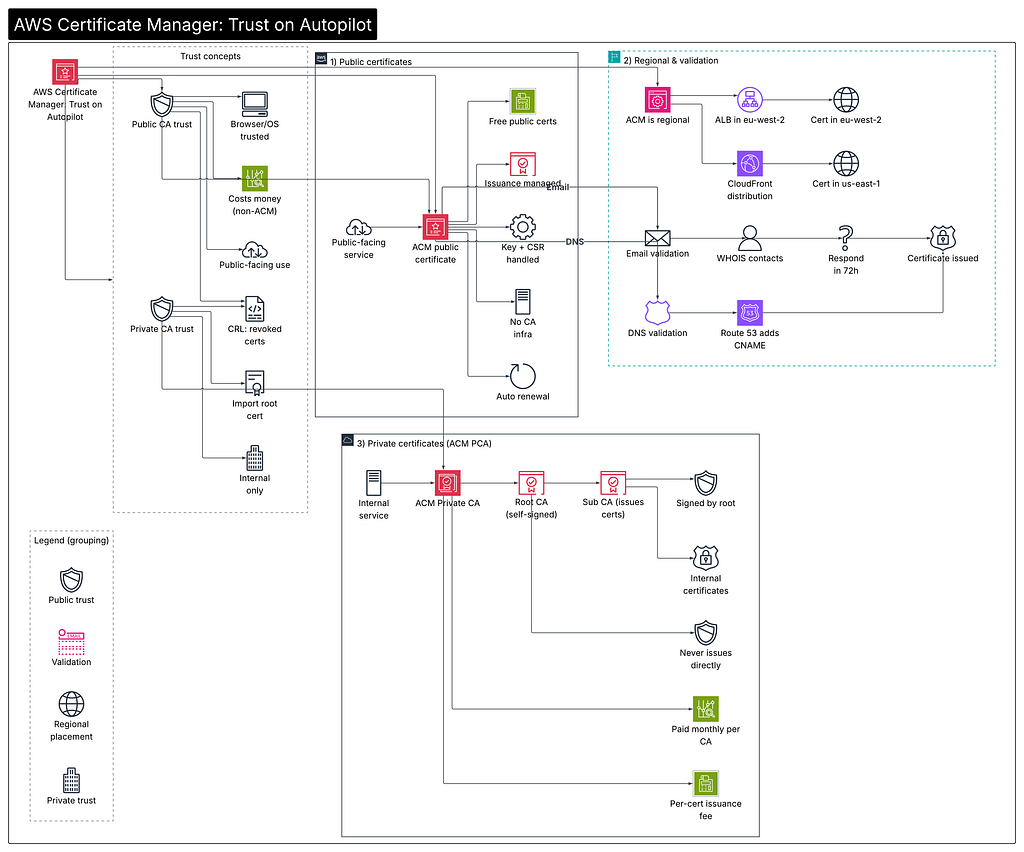
Certificate Manager: Trust on Autopilot
So far, we’ve learned how to create, manage, and protect our cryptographic keys. But how do we know that the server using those keys is actually trustworthy? That’s where Digital Certificates come in.
A digital certificate proves that we can trust a Public Key. That trust is established by a Certificate Authority (CA).
There are two main types of Certificate Authorities.
- Public CA: Trusted by browsers and operating systems by default. Issuing certificates costs money, and they’re used for internet-facing applications.
- Private CA: Things work a little differently here. Before anyone can trust the certificates it issues, we first have to install the Root Certificate into a trusted certificate store (Trusted Store). While issuing certificates is essentially free, we're responsible for managing the entire PKI infrastructure ourselves. That's why Private CAs are typically used only for internal systems.
There’s another concept that’s worth remembering: the Certificate Revocation List (CRL).
Every Certificate Authority publishes a list of certificates that should no longer be trusted. This allows revoked or compromised certificates to be automatically rejected by clients.
This is exactly where AWS Certificate Manager (ACM) makes life much easier.
With ACM, we can:
- Request free Public Certificates.
- Skip the manual creation of Public/Private Key Pairs and Certificate Signing Requests (CSRs).
- Avoid managing our own Certificate Authority infrastructure.
- Let AWS renew our certificates automatically, preventing the classic “The certificate expired and nobody noticed.” outage.
Here’s one detail that’s easy to forget and often appears in certification exams.
AWS Certificate Manager is a regional service!!!!
For example, if we’re requesting a certificate for an Application Load Balancer (ALB) in eu-west-2, the certificate must also be created in eu-west-2.
There’s one important exception.
If we’re using Amazon CloudFront, the certificate must always reside in us-east-1 (N. Virginia), regardless of where the distribution actually serves traffic.
So what do we need when requesting a Public Certificate?
Just two things:
- The domain names we want to secure.
- A validation method.
There are two ways to validate domain ownership.
- DNS Validation: We add a CNAME record to our domain. If we're using Amazon Route 53, ACM can create this record for us automatically.
- Email Validation: ACM sends validation emails to the contact addresses listed in the domain’s WHOIS record. We have 72 hours to approve one of those emails.
But what if we want to issue our own Private Certificates?
In that case, we first need to deploy ACM Private Certificate Authority (Private CA).
This requires building a simple certificate hierarchy.
- Root CA: Creates its own Self-Signed Certificate but never issues end-user certificates directly.
- Subordinate CA: Signed by the Root CA and responsible for issuing the certificates our applications will actually use.
Finally, here’s one last thing to remember.
ACM Private CA isn’t free. We pay a monthly fee for each Certificate Authority we create, plus an additional charge for every certificate it issues.
That’s why Private CA is designed for internal trust within an organization, not for customer-facing internet applications.
Final Dance
Every service we’ve covered in this chapter answers the same fundamental question from a different perspective: Who should we trust with our keys, and how much of that trust are we willing to delegate?
- AWS KMS: If you want to manage your cryptographic keys securely without worrying about the underlying HSM infrastructure, AWS takes care of that for you.
- AWS CloudHSM: If you want complete ownership and control over your keys, CloudHSM gives you dedicated HSM hardware that’s exclusively yours.
- AWS Secrets Manager: Instead of hardcoding passwords and API keys into your applications, it lets you store them securely and even rotate them automatically when needed.
- AWS Certificate Manager (ACM): It automates certificate provisioning and renewal, ensuring your applications always use trusted TLS connections.
By now, we’ve seen that data protection is much more than just encrypting data. It also means managing our cryptographic keys, secrets, and certificates the right way.
Thank you so much for making it this far and for taking the time to read this article.
I’ll see you in the next part. Until then, take care. 💛
References
- KMS Key Types (Customer Managed, AWS Managed, AWS Owned)
- KMS Key Policies
- KMS Grants
- AWS CloudHSM Getting Started (Clusters, VPC, ENI Setup)
- AWS CloudHSM CLI User Management (PRECO, CO, CU Roles)
- AWS Secrets Manager Cross-Account Access Tutorial
- AWS Secrets Manager Cross-Account Access (Resource Policy & KMS Key Policy Examples)
- AWS Certificate Manager (ACM) Getting Started (Public & Private Certificates)
- AWS Certificate Manager Private CA (Private Certificates)
- Amazon CloudFront SSL/TLS Certificate Requirements (us-east-1 Requirement)
- AWS Certified Security — Specialty (SCS-C03) Certification Preparation
If this write-up helped, consider sharing it or exploring more of the log.